
1. Page loaded for the first time
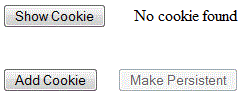
2. Show button clicked
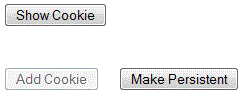
3. Cookie added
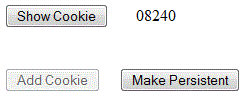
4. Show new cookie
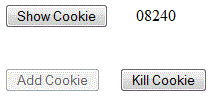
5. Make cookie persistent
(opening a page with a persistent cookie will have
buttonsin the same state but will not display the value)
6. Cookie deleted
CSIS 4135 Lab 2
You can work in pairs on this assignment.
Getting started
Create an Empty Web Site and name it Lab2.
Practice with cookies
Add a Web Form called Cookies.aspx.
In this exercise, we'll set up a page that will be used to experiment with cookies. The page should have a button for showing a stored cookie, a button for adding a cookie, and a button that will alternate between making a cookie persistent and deleting it. Use a "Zipcode" cookie or anything else if you prefer.
When the page loads, check for the "Zipcode" cookie and enable the Add Cookie and Make Persistent buttons as appropriate.
Clicking the Show Cookie button should always display the value of the cookie or the message "No cookie found".
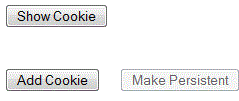
The Add Cookie button should add a session cookie for "Zipcode" with an appropriate value. It should also enable the Make Persistent button and clear the cookie message. The Add Cookie button should be disabled whenever a cookie is present.
The Make Persistent button will set an expiration for the cookie. When making the cookie persistent, it should change its text to Kill Cookie. When it is deleting a cookie, it should change its text to Make Persistent, disable itself, enable the Add Cookie button, and clear the cookie message.
|
1. Page loaded for the first time |
2. Show button clicked |
3. Cookie added |
|
4. Show new cookie |
5. Make cookie persistent (opening a page with a persistent cookie will have buttonsin the same state but will not display the value) |
6. Cookie deleted |
Maintaining state with ViewState
Add a Web Form called Cart.aspx.
ASP.NET keeps state information about the controls on a page in the hidden field __VIEWSTATE. You can see this when you view the source code of a .aspx page in a web browser. You can add data to this field programatically by using an object called ViewState. This technique could be used to maintain a shopping cart on an e-commerce site.
In the Page_Load method for Cart.aspx, put the following statement so that it will only be executed on the initial page load:
ViewState.Add("cart", "");
Now add a CheckBoxList to the page. Add at least 4 items to the CheckBoxList.
Add a TextBox to the page. Make it read only and multi-line, with 4 rows. Put a Label above the TextBox that says "Shopping Cart".
Add a Button to the page and have it display "Add to Cart". In the event handler for the button, loop through the CheckBoxList and append the selected items to the ViewState for the cart. Then assign the cart data to the TextBox so that the contents of the cart is displayed. Each item should be displayed on a separate line.
Session state
An alternative to storing state information in the web page is to store it in a session variable on the web server.
In this exercise we'll use a session variable to count the number of times a button is clicked during the session.
Add a Web Form called Counter.aspx.
Add a Button and a Label to the page. In the code behind, declare a private int variable to represent the click counter.
In the Page_Load method, check to see if Session["count"] exists. If it does, copy its value to the counter variable.
In the event handler for the button, increment the counter and put its value in the Label to be displayed on the page.
In order for the updated count to persist between page requests, the counter variable needs to be copied back into Session["count"].
Test this application in different browsers, multiple tabs in the same browser, multiple windows for the same browser to see how each reacts Also try just using the counter variable and not the Session object to see what happens. Be sure you can explain why things occur as they do.
ASP.NET uses a session cookie with an ID to identify different browser sessions. You can look at these with tools like FireBug (check the headers). Some cases (such as a user who has disabled cookies on the browser) require a session to be cookieless. This can be done by adding the following to the <system.web> element of the Web.config file:
<sessionState cookieless="true" />
Try this and note how the session ID is passed. Also observe that the headers no longer include the session cookie.
Passing values between pagesThe ability to do this has been around for quite awhile, but ASP.NET makes it simple to accomplish.
Add a Hyperlink control to the Counter page. In the Properties for the control, enter the following for the NavigateURL:
Page2.aspx?item=Hello
The name-value pair appended to the URL will pass data to the target page.
Add a web form Page2.aspx to the project. Add a label to this page, and in the Page_Load method, assign the following to the label's text:
Request["item"]
View the Counter page in a browser, and hover over the hyperlink. Notice the URL displayed at the bottom of the browser. Now click the link and Page2 should show the value on the label.
Go back to the Cart page and add a Button. Set the PostBackURL for the button to Checkout.aspx.
Add a web form called Checkout.aspx to the project. The Request object can access the text box from the Cart page by using its ID as a key. Add a similar TextBox to this page and in the Page_Load method, assign the contents of the text box from Cart to it.