CSIS 4135 Lab 1
You can work in pairs on this assignment.
HTML and CSS with Visual Studio
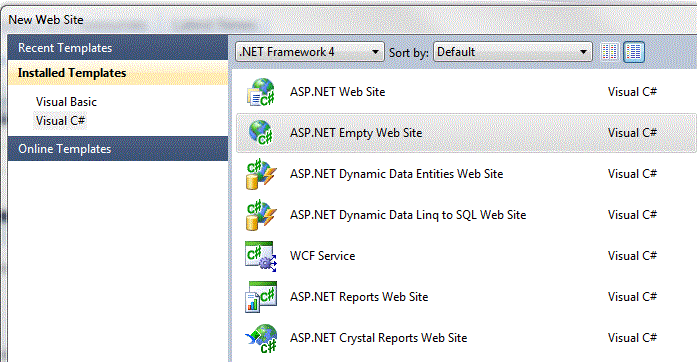
Launch Visual Studio 2010, and create a New Web Site... In the New Web Site window, select the ASP.NET Empty Web Site template, and use Visual C#.

Change web site name in the Location from WebSite1 to Lab1. Finally, click OK. When this finishes, your site will be listed in the Solution Explorer on the right side of the Visual Studio window.
Right click on the icon for the Lab1 project and select Add New Item... Select HTML Page from the list, and change the name to Hello.html. (or ckick the new item icon
![]() on the toolbar)
on the toolbar)
You'll now have an editor area displaying the HTML source code for this file.
Change the title of the page to Lab 1 - HTML .
Insert a level 1 heading in the body of the document with Hello HTML World as its contents. Use the Properties panel to center it and change its Style to use Arial font, yellow color, and green background (or, use any text and colors that you want). Switch to Design view. Save the file. To view the web page, right click on Hello.htm in the Solution Explorer, and select View in Browser.
Take note of the URL for this page.
Close the browser window.
Add an external Style Sheet called mystyles.css to the project. Define a selector to format text with whatever characteristics you want for font, size, colors, etc.
In the View menu, select Apply Styles and Manage Styles to display panels that make it easier to work with CSS in your project. Attach the mystyles style sheet to the page.
Add at least two paragraphs of text. Apply your style to one of the paragraphs.
Save the changes and view in a browser.
Move the heading style definition into the style sheet and reference it in the <h1> tag to keep the same style formatting as before.
Save all files and view the page in a browser.
Then make a change in the style sheet and view the page again to see that the change takes effect.
ASP.NET with Visual Studio
Back in the Solution Explorer, do Add New Item... and select the Web Form template. Rename it to Hello.aspx. and uncheck the Place Code in Separate File box.
Switch to Design view. Change the document title to Lab 1 - ASPX in the Properties panel.
Add a table with three rows and one column to the page. Center the table and make its width 50% of the page width. Add a Label to the top cell in the table by dragging it from the toolbox. Select the label and in the Properties panel, change its content to Hello World. Add Labels to the other two cells. Make the contents of the middle label ASP.NET Style and the bottom one Using Visual Studio 2010. Select first two labels by Ctrl-clicking and change their Font to Arial. Select the first label and change the font size to XX-Large, Bold. Make the second one font size smaller than the previous. Change colors to anything you want. Select the third label and apply your CSS style to it.
If necessary, select the table and drag it wide enough so that all of the labels fit on a single line.
Save the file and view in a web browser.
Change to Source view and observe the code that was generated for this page.
ASP.NET Page with Code Behind
Add another Web Form (this time with Place code in separate file selected). Leave the name as Default.aspx.
Drag a Label from the Toolbox to the design surface. Change the ID of the label to CurrentTime. Double click anywhere in the design window and the C# "code behind" will open in an editor window. You should see a method called Page_Load. In the body of this method, add the line
CurrentTime.Text = "The current time on the server is " + DateTime.Now;
Save the file and view the page in a browser. Click the refresh button a few times and notice that the time displayed changes.
From the Toolbox, drag a button and another label onto the page. Change the text on the button to Click and change its ID to Update. Delete the text from the label and change its ID to Switch. Set the label's ForeColor property to White. Save and view the page again. Press the button a few times. Notice that the displayed time changes when the button is clicked. Why?
Go back to the Page_Load method and put the above assignment statement inside an if statement with the following condition:
if (!IsPostBack)
This will prevent the assignment statement from being executed when the page is loaded due to a "postback" to the server, such as when a button is pressed. Save and view in a browser. The time displayed should not change when the button is clicked.
Of course the button doesn't do anything now. Double click the button. This will take you to the Update_Click method. We'll add some code in a moment, but first add the following line just above the Page_Load method:
private static int count = 0;
Now go back to the Update_Click method and add the following:
if (count % 2 == 0)
{
Switch.Text = "ON";
}
else
{
Switch.Text = "OFF";
}
count++;
Also add statements that will make the label's BackColor be Green when it displays ON and Red when it displays OFF (search for info about the System.Drawing namespace to find how to set color values).
The purpose of this is to alternately display On and Off each time the button is clicked. Save and view the page, and click the button a few times. The label should change, but not the time.
Go back to the Page_Load method and comment out the if statement. Run the page and click the button. Not only should the label change, but the time will too. This shows that clicking the button does involve processing on the server. Use the browser's view source code feature to look at the page source code before and after clicking the button.
Go back to Hello.aspx and click on the Source tab to look at the source code. Notice the labels have an attribute runat="server". Also note that it doesn't look the same as the html that was sent to the browser.
Right click Hello.aspx in the Solution Explorer and select Browse With… Choose a different browser this time. It should still work.
ASP.NET Controls
Make another Web Form, and again make sure that the Place Code in Separate File box is checked. Call it Controls.aspx.
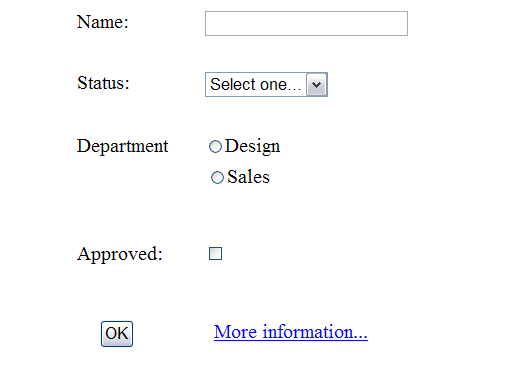
Insert a table into the form with rows and columns to arrange controls similar to the figure shown below. Drag a Textbox, a DropDownList, two RadioButtons, a CheckBox, a Button, and a Hyperlink into the table and arrange them as shown.

Type the labels and change the text of the button as shown above.
Click the triangle in the upper right corner of the DropDownList and choose Edit Items. Add items that say: Select one..., Inactive, In progress, Complete. Set the Selected property of the Select one... item to true.
Change the text on the radio buttons to Design and Sales.
Change the text on the hyperlink to More information... and link it to the Default.aspx page.
Save the file and view in a browser. Experiment by typing in the textbox, clicking in the radio buttons, checkbox, etc. Notice that it is possible to select both radio buttons. This shouldn't be possible. Fix it by setting the Groupname of both to Department. Save and view to verify that now only one may be selected.
Validation Controls
Forms like this need validation to be sure the user has entered all necessary data. ASP.NET has controls that make this easy. Drag a RequiredFieldValidator next to the text box. Change its text to Name Required and make its ControlToValidate be TextBox1.
Save and view. The error message should be displayed if the OK button is clicked with the text box left blank.
Drag a CompareValidator next to the DropDownList. Change its text to Status Required, and set its properties so that the message is displayed when the user does not select one of the three status values from the list. Save and test your work.
Let's customize the error handling by dragging a ValidationSummary onto the page and placing it below the OK button. Copy the text for the two validators to the ErrorMessage field, and change the Text to *. Now if the user does not fill in these values, the * should be displayed by the field and the error message(s) displayed in a bullet list below the OK button.
Add one or more labels that will display a Success message when the form is completed properly. Appropriate messages would include the word Success, and show the name, department, status, and approval values with identifying labels. Include code to do this in the Page_Load method. The messages should only be displayed when a PostBack occurs (i.e. when the form is submitted to the server).
Add another button to clear the form and remove any displayed messages.
There are a number of ways to send form data to another page. With our current setup, the easiest way is to use the Response.Redirect method to transfer to a new page when the button is clicked. This method needs a String parameter with the URL of the new page. Also, add the data to be transferred encoded as a name-value pair as discussed in class. Then the receiving page can access this data with the Request.QueryString method. This method needs a parameter that is a string containing the name from the previous URL. Make one more page that will display the form data using this method.
Take your work with you
In the lab, files for your web site are located in the Visual Studio 2010\WebSites folder, located in the Documents of a normal installation. Just copy them to work on them on another computer.